Handling massive loads is plays a crucial role in web development. It is good practice to test your API s for getting an overall image on huge traffic. There are plenty of awesome tools for testing purpose.
One of the famous tool is called JMeter. This application developed by Apache and an open source project. You can make load tests for:
- HTTP, HTTPS
- FTP
- SMTP
- ...
The core of JMeter is Java language. So we need to have a Java environment on your local/remote machine. Let's get started from scratch on Ubuntu OS.
Step 1 - Setting Java
First check your system whether you have a Java or not:
java --versionLatest version of JMeter requires Jave 8+ version.
If you see something like this, you are good to go move on next step:
If your result "The program ''java' can be found ..." you can install Java by following(full tutorial for installing Java):
sudo apt install openjdk-9-jreStep 2 - Download JMeter
You need download binary of program from JMeter official website:
https://jmeter.apache.org/download_jmeter.cgi
Let's download in terminal (~70 MB):
wget https://downloads.apache.org//jmeter/binaries/apache-jmeter-5.4.1.tgzNext unzip an archive:
tar xf apache-jmeter-5.4.1.tgzNext change directory to apache/bin folder:
cd apache-jmeter-5.4.1/binLaunch GUI application
./apacheStep 3 - Write test plan
Firstly we need a create test file. So previous step you launched GUI of JMeter and we will do some configuration. It is good to do this on your computer, not a remote server. After finishing configuration you can test it on powerful remote server.
Give a name to your test(default: Test Plan):
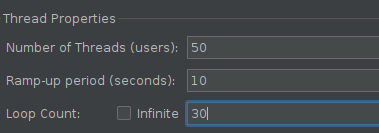
Then right click on left side to your "Project name"And there are 3 parts:
Number of Threads (users) - number of visitors/requests to your website
Ramp-Up Period (in seconds) - delay period between 2 theads.
Loop count - number of loops for threats. You can make it infinite by selecting checkbox.
Next we will test our API by adding HTTP request:
I want to test just the GET method for tutorial purpose. You can make any type of HTTP request (GET, POST, Patch, ...).
This is end of preparing part. We need to save this plan in ".jmx" format by clicking save button.
Step 4 - Run a test
There are 2 types of to run a test file.
- On GUI - this method is not perfect massive loads such as 10~50K~... . But by doing a test on GUI, we will make sure everything is correct on test plan.
Let's get summery result. You can choose any type of report.
Now you can click green "Play" button top sidebar.
- On terminal - you can get a powerful remote server(and good Internet connection) and do massive tests on this method. If it is a new server, you need to repeat 1, 2 steps on a server to configuration.
Next, we need create .jmx file and copy all codes saved from step 3.
Open server's terminal and go to JMeter's folder and create a new by following:
touch test.jmxCopy all codes from your local code and paste it to this file, save it:
nano test.jmxRunning test file on terminal
Make sure your on folder on ./bin folder
pwdRun script:
./jmeter -n -t test.jmxResult
By default JMeter is allocates only 1 GB RAM, if you want to increase and allocate more size, open jmeter in Text editor, change this lines:
"${HEAP:="-Xms1g -Xmx1g -XX:MaxMetaspaceSize=256m"}"If you want increase 1 GB to 8GB change to this and save the file:
"${HEAP:="-Xms8g -Xmx8g -XX:MaxMetaspaceSize=256m"}"If you want to save logs as file add -l flag and filename to option:
./jmeter -n -t test.jmx -l logs.txtConclusion
Now you are learned how make load tests. Feel free contact to me any question and suggestions mr.nodirbek77@gmail.com


Comments
Post a Comment